
Remember when 301 redirects were the talk of the town?
No? Me neither. But that’s search engine optimization for you.
It may not be sexy all the time. Hell, it rarely is. But if you pay attention to detail, and don’t mind doing the nitty gritty, you’re going to be a step ahead of the competition.
You also don’t want to just follow the crowd and the latest trends. Rather than parroting a “guru”, it pays to do your own research.
[bctt tweet=”Pay attention to detail and look for opportunities to improve your SEO game — no matter how boring they may seem conceptually.” username=”rankpay”]
With that in mind, we’re going to cover 301 redirects today.
It’s one of those things that you’ll want to have done right ahead of time. It’s a big step in the right direction for improving user experience, and it doesn’t hurt when it comes to showing Google your site architecture is clean and up to date.
What are 301 Redirects?
First of all, “301” is simply the HTTP status code for “moved permanently”.
It tells both web browsers and search engines that the content is irreversibly moved to another URL. For instance, let’s say you have an old article about a Google algorithm update.
But now that there have been may subsequent updates, and your article contains too much out of date information to salvage, you decide instead to create a more recent “retrospective” article on that former algorithm change.
This is the perfect time to leverage a 301 redirect.
But there are many times when it would be appropriate to use this permanent form of redirection.
Here are a few others:
- Your website is under construction. If your web redesign project will take several weeks to finish, you can preserve your rankings with 301 redirects to a different page.
- You’ve re-branded your site. 301 redirects are also useful if you need to carry over traffic to a new URL under a new brand identity.
- You’ve recently transitioned from “HTTP:” to “HTTPS:”. You can use a 301 redirect to make sure only the “HTTPS” version of your site can be accessed by users and crawlers. We covered this topic specifically here.
Before You Begin
In the past, Google saw this as a potential loophole that webmasters may try to capitalize on in order to manipulate search rankings.
It was around that time that Matt Cutts himself confirmed that 301 redirects would result in a 15% loss in Page Rank (this is no longer the case).
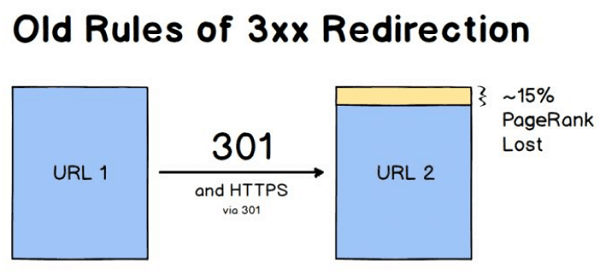
Image source: Moz
But to promote the adoption of the more secure “HTTPS”, Google eventually lifted this penalty. In fact, all forms of 30X redirects now no longer directly affect link equity or the page’s ranking power.
So, does that mean you can redirect your most popular blog post to your affiliate product page? Not quite.
If you use 301 redirects to bring users to unrelated pages, search engines may see them as “soft 404s”. This may eventually prompt search engines like Google to de-index the content altogether.
So don’t try to get cheeky with redirects. Just use them as intended and you’ll be fine.
How to Do 301 Redirects
Now that our little history lesson is over, let’s get down to business.
How exactly do you implement 301 redirects? It’s not actually that bad.
Provided you consider yourself to be at least an average webmaster, there are two viable 301 redirect methods you safely execute.
The first one can be done through your website’s .htaccess file.
Path A: Setup 301 Redirects Via Your .htaccess File
To start, you’ll want to log in to your hosting account’s control panel. For most web hosts this well be the cPanel.
While the interface itself may vary from host to host, all of them should have something called a “File Manager” that you can launch from your cPanel.
Launch this and locate the root folder of the website you wish to perform 301 redirects to.
The next step is to open your website’s .htaccess file. If it doesn’t exist, simply create a new file and name it “.htaccess”.
Take note: With some web hosts, you’ll be required to enable the “show hidden files” option first. So if you can’t find the .htaccess file at first, look for that option and make sure it’s enabled.
Also, as with any changes to your websites files, it’s a good idea to create a backup of your .htaccess file before you make any modifications.
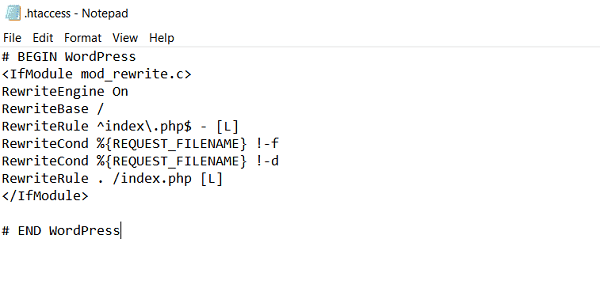
Once you have your .htaccess file loaded, you should be able to see the default permalink parameters of your site:
Here comes the fun part.
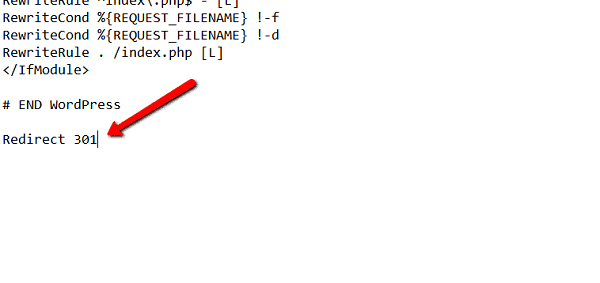
To implement a 301 redirect, just enter the words “Redirect 301” below the line that says “# END WordPress”:
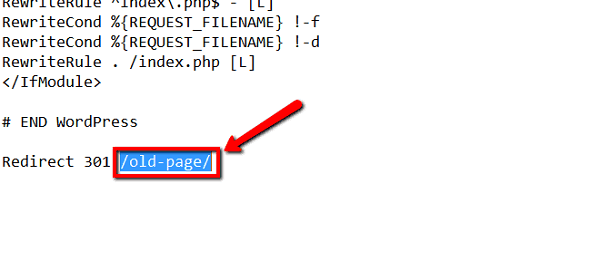
Next, you’ll need to specify the old URL that you’d like to redirect traffic from.
But since you’re modifying the .htaccess of a specific domain, you only need the URL elements after the “.com” extension. For the rest of this article, we’ll refer to this part of the URL as the “slug”.
For example, if the page you want to redirect is “www.mysite.com/old-page/”, you’ll only need to enter “/old-page/” to implement the 301 redirect.
To complete the redirect, all that’s left to do is to add the full URL of the new page. Suppose you want to redirect traffic from the old page to “https://www.yoursite.com/new-page/”:
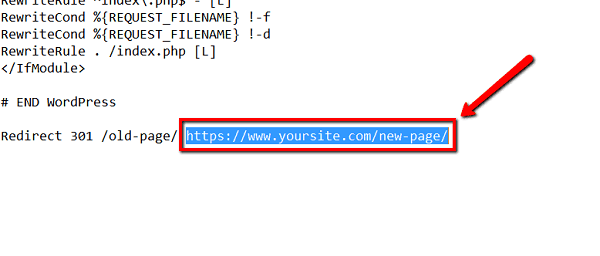
That’s actually all there is to it! Go ahead and save your file to apply the redirect.
If you need to redirect multiple pages, simply create a new line in your .htaccess file and repeat the steps above. Just remember that the syntax for 301 redirects via .htaccess is “Redirect 301 (old page) (new page full URL)”.
Method 2: Using 301 Redirect Plugins
If the previous method isn’t easy enough for you, you can make things even simpler with WordPress plugins.
Of course, your website must run on the WordPress content management system (CMS) for this to be a viable method. But who are we kidding? Over 50% of the web runs on WordPress. It’s a fair guess that your website does too.
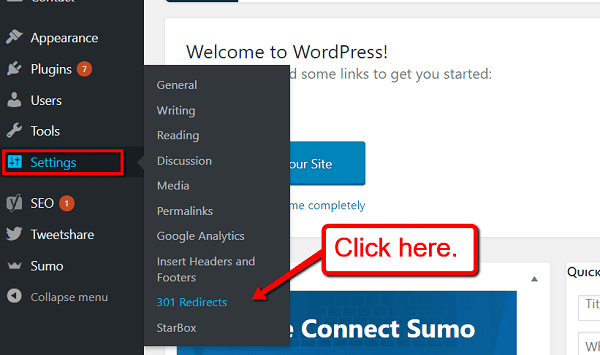
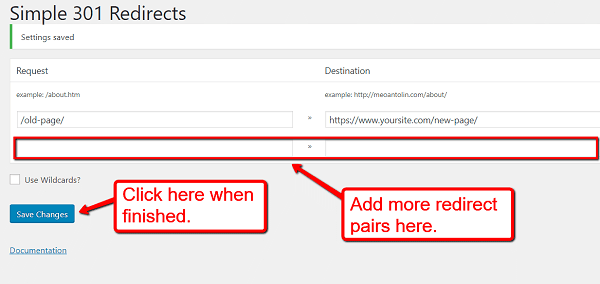
One of the most popular plugins for dealing with redirects is Simple 301 Redirects. Install it like you would any other plugin, and then head over to the “Settings” tab of your WordPress dashboard. Get started by clicking “301 Redirects” to launch the plugin.
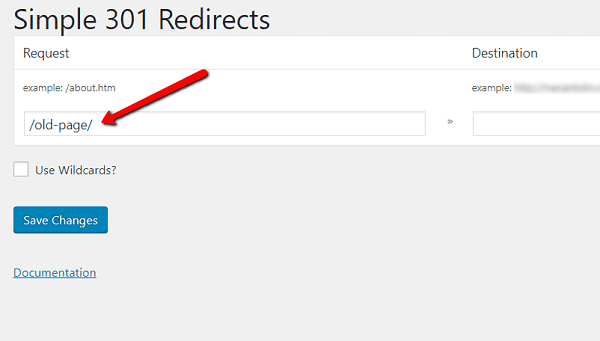
The interface of Simple 301 Redirects is quite straightforward. First, add the slug of the old page under the “Request” column.
Next, paste the full URL of the new page under the “Destination” column.
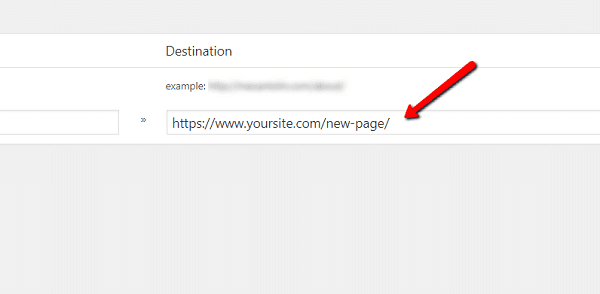
Finally, press “Enter” to complete the redirect and create a new line for more URL pairs. Don’t forget to click “Save Changes” to apply your redirects upon closing the plugin.
Things to Remember
Whichever method you choose, keep in mind that all redirects come with a certain degree of risk. So be sure to double-check your work before making any changes live.
Also, be sure to keep the following guidlines in mind:
- 301 redirects can also be used temporarily. Despite what the code stands for, 301 redirects can also be used if you only need to divert traffic temporarily.
- Link the “https://” and “https://www” versions of your site. The most common use of 301 redirects is to streamline the access between different URL structures. For example, redirects can be used to bring users who type “https://yourblog.com” to “https://www.yourblog.com”.
- Always use 301 redirects when changing domains. Regardless of content, new domains will be re-indexed as such by search engines. That means if you don’t use a 301, any SEO work you’ve done up to this point will be thrown out the window! Simple put a a 301 redirect in place to prevent that from happening.
Conclusion
Properly employing 301 redirects may not be much fun, but it’s an important step to ensuring your website is in a good position to maximize any and all SEO relevance.
Be sure to check that you’re using them correctly if you make the swap to HTTPS, if you’re moving to a new domain, or if you simply want to nix some out of date content!